Apr
8
2008
So is the studio finished I hear you ask.
No. It’s not.
Well the room was finished but that was just a blank canvas. I have to fill the canvas and make it a useable place before I can move in. This mean furniture. Yes I know I could just go to Ikea and kit it out with all I need to get things rolling. But if I did that with the intention of sorting it out nicely some time when I have enough time, then I know it would never happen. You get blind to dodgy furniture and space use shortcomings and muddle on. I figured that as all that time was spent doing the structure of the room right I should continue in that mindset and do the furniture right too. Oh sure I have the odd bit of nice furniture I have picked up over the last few years but not enough and not stuff which would work well in the space.
So.
Start from scratch…
(Yeah your right I don’t do things the easy way… Where is the fun in doing things the easy way.. No challenge.)
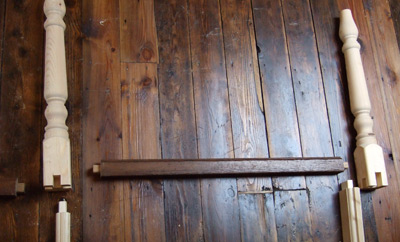
I had the good fortune a couple of years ago to discover an old (Early 20th century) sloped desk at the back of a furniture clearance center in Huddersfield. It looked (from the kipple that was still in it’s drawers) to have last been used at a Taylors or possibly in a cloth cutting department in a Mill back in the early Eighties. It is a huge old sloped work surface with three drawers beneath in style of a campaign cabinet. And a spin at only £20.. Once I had spend a couple of days scrubbing it, cleaning off the old laquer and re oiling and waxing it, it would have fetched several hundred pounds in an antique centre.
I have had it cluttering up several rooms stood up on its end ever since, knowing one day I would have a suitable room for it.. And this is that room.. Except it has no legs…
Luckily for me on a recent trip to the most splendid Beamish living Museum ( http://www.beamish.co.uk ) I had seen a desk very like this as it would have been in situ at the time of it’s construction. So I now knew what it would have looked like originally. After an exhaustive hunt for old table legs which would be suitable I gave up on finding anything reclaimed and turned to reproductions. I hunted down a place online which did wood turning and purchased three legs from them in a style very similar to the ones I had seen. I then decided that the remaining framework should be built using traditional woodworking joints in the Arts & Crafts tradition in which I am refurbishing the house.. So I had to master a few basic woodworking skills like cutting in a straight line and using a Chisel tolerably. I constructed a support frame with these budding skills using some new wood and some reclaimed pieces from an old dining table. I figured some new wood was ok as I was going to have to stain the new legs to match the colour of the desk anyway..
This to my surprise went pretty well any gave me a stable work space..
I then took a month or more painting pictures of Mechtorians on this workspace for an upcoming solo show at Rivet in June.
Last week I returned to the job of finishing the studio. So the support frame was stained and oiled and waxed and all worked splendidly..
I then turned my attention to storage.. I constructed a wide shelf for one end wall of the room from some of the floorboards I had removed from the room. I cut out the bad parts and sanded and oiled them and fixed them up to the wall using a couple of cast iron Victorian toilet systern brackets I got from Ebay (Once I stripped the old paint off, wire brushed the rust down and recoated with a suitable brass enamel paint they looked pretty good… I would have preferred to leave them the bare polished metal but the rust damage was too deep to make that work..)
I then set about constructing a shelving unit to run the length of the room which could have a large storage space under the eaves behind it for all that stuff that one usually keep in an attic..
I drew up plans to make best use of the odd sloping space beneath one of the beams and started in..This unit is mostly intended to house books of varous sizes, other storage media and canvases and prints (slid back into the eves space through the tall opening at the far right..
It will ultimately be closed in with an end wall to the left and a door to access the storage crawlspace..
This is the main construction.
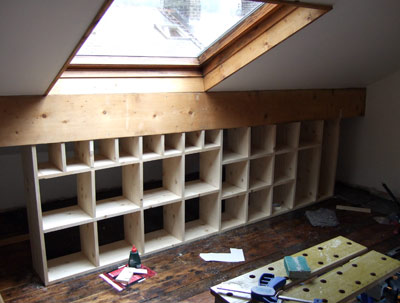
Since this pic was taken I have finished the shelves to the point of staining and have also designed and built another smaller unit of shelves and a large display cabinet to house a sizable chunk of my toy collection… More info and pics of that in the next blog..
I figure at this point I have about one more weeks work before I can start unpacking boxes…..
1 comment | tags: Studio | posted in Studio
Jan
24
2008
I have been spending most of this dark and chilly (and very very wet) January working on the studio conversion in the hopes of having it finished by the end of the month.
Mostly this has included painting.
Which took longer than expected due to all the fiddly bits along the edges of all the beams.
And three coats required plus the plaster primer.. But that was all done in the end.
Then the radiators were fitted and warmth was returned..
The radiators were cast up specially for us from a French design dating to the very early 20th century. They are real cast iron (not steel like modern radiators) from molds taken from the originals. They are insanely heavy. It took two men to just about move one..

After they went in the skirting boards were cut to size, stained, oiled and waxed.. That took a few days as there was about 30 meters of the stuff. Of course there is not a right angle or a straight wall in the place so there was a lot of jiggery pockery to get them to fit.
Then the floors all got a second coat of traditional Hard-Wax oil.. Great stuff. But damn stinky.. After a few hours of it you feel like your head is filled with washing up liquid.
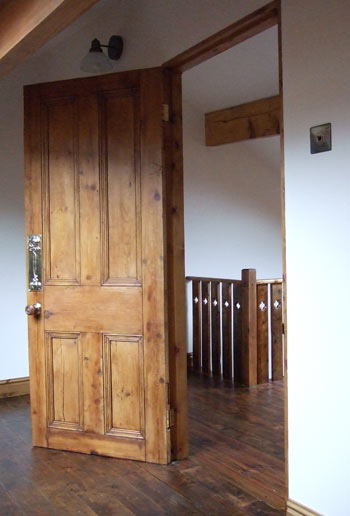
Whilst the floors dried for a few days I worked on the two doors for the room. The small seperating door had been purchased for the job and was pre stripped. The one at the bottom of the stairs was taken away and stripped for us. Then I cleaned them up, rubbed them down, oiled them with Boiled Linseed Oil and waxed them..
The small door was cut and fitted with new handles purchased as a set from Ebay. Hand turned Teak I think. All the dooors in the house will match when I am done. They were fitted with antiqued Brass furniture. A pressed Brass finger plate was also fitted to each side of the door. These too were an Ebay find. They are reproductions of an Arts & Crafts Movement design. The polished Brass looks great with the pocked and gnarly wood of the door.
The stair door had an original Victorian Rim Lock. There are only two left in the house. I needed to remove it from the door and clean it up by hand.
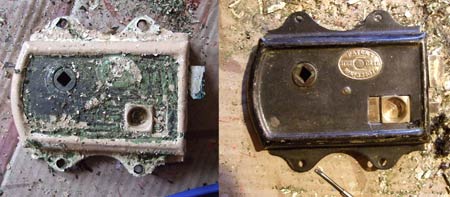
There were six layers of paint on it. But it works now. As its steel and rather scratched I re-enamelled it on the black areas before fitting it back on the door. I dont have photos of that door yet as I hung it on a different day to the small door. I will get pics of everything when its all done.
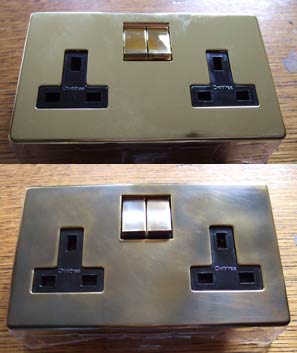
The light switches and elecrical sockets all got their plates fitted now too. But by now you probably realise I cant leave anything alone and had to tinker with them. We went for Toggle switches with minimalist backplates (no visible screws). These are modern fixings which come in a highly polished Brass. New polished Brass looks nasty to me. Like cheap gold. But being solid Brass I was able to clean off all the clear laquer coat and age them in a little acid bath I had made up. Then they are waxed to set the desired finish. I dipped and polished each plate and switch three or four times to build up an interesting patina. Some before and after pics…

So that is the guest room completed. The work to fit all the furniture into the Studio has begun. I now have the task of turning a nice empty room into a functioning space..
More to come……
11 comments | tags: Studio | posted in Studio
Dec
16
2007
So I have been asked if my studio is finished yet..
The answer.. I wish!
I bit off more than I could chew this year. And it decided to bite back..
I thought this would be finished by October (I started in February)..
So whats happened since then?
I boarded out the stud wall with plasterboards and cut holes for all the electrical sockets and phone points and whatnot.
Figuring out exactly where to cut an opening for a socket in a large sheet of board before attaching it to the wall is tricky.
Answer wet the edge of the metal socket box, offer the uncut board to it, take it down and cut where the wet marks are on the board..
I then boxed in around the windows with wood. The previous people had used hardboard.. That wasnt going to cut it for me so pine it was. Stained to match the old pine in the floor. This job was the seemingly simplest and in actuality the most difficult to achieve. It took two weeks. I had not realised just how many odd angles there were in this room. Everything is doing its own thing in at least three dimensions if not more..
The plasterer came many weeks later and took about a week to rebuild the removed old plaster over the bricks and then skim the whole attic.
It now feels like a room.
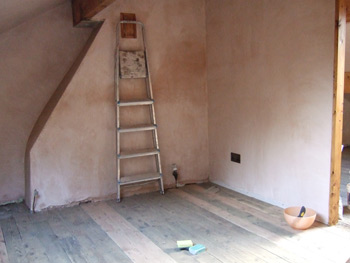
Then whilst it was taking a month for all the plaster to dry out properly I removed all the dodgy old busted floorboards and replaced them with new one. When I say new ones, the wood was reclaimed victorian pine which had been cut to size and thinchness to mach the old boards. It was frighteningly expensive. But its much denser than new pine is.. You can see the replaced boards in the second photo. I swapped out about 22 meters of boards in the end. And did lots of filliting on other gaps. The new boards need staining down to match the patina of the old boards. I didnt throw the old boards out. I cut them all down widthwise to get rid of all the busted edges and de-nailed them all and scrubbed them all and sanded them all. And built an improved ballustrade for the staircase from them.
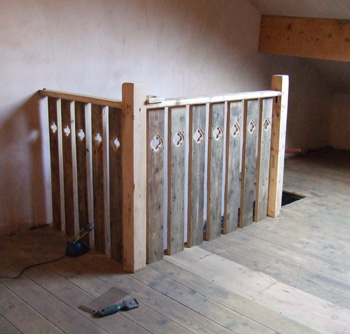
It’s kind of a Voysey styled attempt. The overall look of the room will be Arts & Crafts movement with some Victoriana and Steampunk mixed in. The posts and handrails need staining down to match the old pine as I was required to sand them back very hard to remove all the layers of paint from them. The handrails are the old cross pieces from the original ballustrade. I am very pleased with how this went. Its the first bit of creativity in the room and the first thing thats not just been hard slog.
By the way, whilst I was doing this I have compleatly redone the master bedroom too as well as all the pieces for a solo show..
I would like a break now please..
But no it goes on..
(more to come)
Comments Off on Studio Conversion part 5. | tags: Studio | posted in Studio
Aug
16
2007
So it was decided that the attic space was so large it could comfortably be split in half to form not only a spacious studio but a fair sized guest / spare / box room… So I did some reading on how to build a wall..
First I need a new door. So out looking for doors we went and soon found a local place that strips old pine doors. A suitably small door was purchased for the attic room and as we were there another three were purchased to replace nasty modern doors eleswhere in the house. Also the fellow came and took our remaining doors away and bought them back a few days later sans-ancient multilayered paint. I still have to sand them down and oil and wax them but thats a lot of tough stripping work I dont have to do any more……. which is nice.
So lots of new, old doors..
A bit of maths later and lots of timber was ordered..
Then lots of measuring sawing and swaring.. And a couple of days later I had up all the studwork (vertical pieces) for the new wall as well as the top and foot plates. I then built the door frame around the new mini door and fixed it in place with the first noggin (horizontal piece). Yes they really are called Noggins.. That made me happy.
Many more Noggins later and then a few more to fix electrical sockets and light fittings to and I had this.
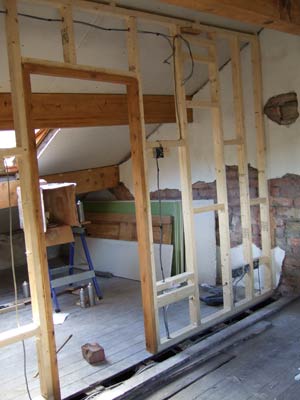
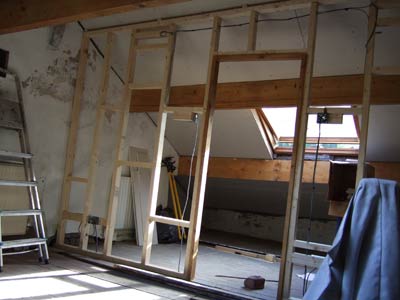

A week or so later and the Electrician arrived to do the first fix (putting in the basic wiring and socket boxes). So now its ready for me to start more plasterboarding..
I stained the pine used for the door frame so it matches the old pine in the door better. I must source reclaimed pine for more of the jobs that need doing really..
By the way. A few people have mentioned that the wall looks better as brick.. well look at this :

That’s what they look like up close.. Not too pretty. And the morter is all crumbly so it would ALL need replacing to have the wall exposed.. Not going to happen..
Moving forward faster now is the plan.. Plasterer booked for six weeks time.. Lots to do to be ready for him..
Comments Off on Studio conversion blog part 4.. Studs and Nogginsis.. | tags: Studio | posted in Studio
Aug
12
2007
Ok bad pun….
So after the insulation went up it was time to board out and make it like a room again.
It took me, with help from my splendid father two solid days to get all the plaster boards in place.

New Ceiling

As suspected there is not a single vertical wall or square angle in the place. Some angles act obtuse when they appear acute! Hmmm like some ancient evil has been lurking here… So lots of trial and error and hundreds of screws. We got quite good at it by the end. It has changed the light quality in the space no end. And the attic is feeling like a room again not a rubble dump.
More loose plaster needs to come off the old wall too. There is still a long way to go. But its moving ahead nicely now.
3 comments | tags: Studio | posted in Studio
Jul
19
2007
So people have actually been emailing me about updates on the studio conversion I am doing.
Truth be owned I have not had much chance to work on it of late.
So I took the decision to take the whole of July off work to hit it hard and push it on a lot.
I have a few solo shows coming up and i really need the extra dedicated room to have several pieces on the go at one time, so I need to get this studio sorted out.
So after I got all the old ceiling down I was left with 76 sacks of rubble and wood to get rid of. Several days of carrying all that down two flights of stairs and out into a skip and it was cleared.
Then came about three weeks of finishing stripping the beams. There are some people who should be shot for their crimes against interior decorating. I took upto nine coates of paint off of those beatuiful wooden beams. In one place some idiot had actually put woodchip wallpaper painted light blue OVER the wooden beam…. !?!…
Anyway with a combination of stripping chemicals (Eco friendly water based ones I should point out), many dedicated hours with a handheld steel scraping blade and a few power tool I finally got pretty much all the paint off. I sanded and oiled the wood to stop any more dirt getting into the beams. I will re-oil and wax them again later on when the proper final decorating is done.
Next up was putting in all the insulation so I dont freeze during the winter.
We chose Thermafleece insulation as it is super eco friendly. Its basically massive slabs of felted wood direct from the hill farms. The off-cuts of sheeps wool that are not suitable for clothing are used to make this. So its like giving your roof a wooly jumper. Its great to work with. Cuts with scissors and no mask or gloves needed unlike the nastly fiber-glass stuff.

I cut the pieces to size and stapled them up to stop them falling out before I could get the boards up.
Leaving an air gap for ventilation. Though the nature of the wool should cut down the condensation problem this room has had in the past.
I managed to get all the insulation up in just over a day.. Nice.

I have been amasing scrummy furniture and stuff for the final studio whilst doing this work. I cant wait to get it all together. But a long way to go yet…
9 comments | tags: Studio | posted in Studio
Apr
5
2007
So as you may know I have recently moved into a new house. The intention is to turn the attic into a studio..
Well this is how its looking so far after 3 months work..


After ripping out everything which had been botched into the room over the last 100 years or so (like laminate flooring over carpet over original wood flooring, a redundant water tank and two huge sets of rubbish chipboard shelves), I could actually see what needed fixing. And that was… er… everything.
The wall plaster is rotten so that has to come off. There was a leak in the chimney which caused the wall to get damp and the plaster to fall off.. Thats all now fixed and drying ok. The next step was putting in insulation as it gets so cold up there in winter that paint would freeze let alone not dry.. After looking at all the options it was decided that unless I wanted to lose about 6″ of headroom.. Which i didnt.. i would have to take the old plaster and Lathe ceiling down, back to the rafters..
So the day before last i started… and now i am half way… And damn its the most filthy work i have ever done. I am literally black like a coal miner right out of a pit after about an hour of swinging a crow-bar..
This pic is after the dust has settled overnight.. You cant see across the room when its mid job..
Ick!

Anyway onwards and upwards. Another week or so of this and lots of shovelling all the rubbish out and it will be time to put some lovely new Eco-friendly sheep’s wool insulation in and re-board the ceiling.. And then the studio can really start to take shape..
Comments Off on Studio Carnage….. | tags: Studio | posted in Studio